Transferring Data from S3 to Amazon Redshift


Introduction
Amazon Redshift is a fully managed, petabyte-scale data warehouse service in the cloud. It allows users to analyze large-scale data using BI tools to gain new insights for their business and customers.
Amazon S3 or Simple Storage Service is an object storage service. We can use it to store and retrieve any amount of data at any time, from anywhere.
In this exercise, our objective is to transfer the data stored in S3 into Amazon Redshift.
Prerequisite
- AWS account with suitable permission
- SQL Workbench/J
- Redshift JDBC driver
Dataset
Here, we have a movies_rating data set. Each user has rated movies and there are a total of five attributes in the data set:
- User_id: The unique id of a particular user
- Age: The age of a user who rated a movie
- Gender: The gender of a user
- Profession: The users’ profession, i.e., whether they are doctors, artists, engineers, etc.
- Ratings: The total rating given by a particular user to various movies
Each field in the data set is separated by a ‘|’ from the other, and each line is separated by ‘\n’.
The data can be downloaded from this link.
Steps
To successfully complete our exercise, we will:
- Create an IAM Role
- Create an S3 bucket and upload the data file
- Create a Redshift Cluster
- Setup Connection with Redshift Cluster
- Transfer data from S3 to Redshift
Step 1: Create an IAM Role
- Sign in to the AWS Management Console and launch the IAM service.

2. On the Navigation pane, click on Roles.

3. Click on Create Role button.
4. Select AWS service under the Trusted entity type.

5. Select Redshift from the dropdown menu under Use cases for other AWS services and choose the option Redshift — Customizable. Click Next.

6. Select AmazonS3ReadOnlyAccess permission policy and hit Next.
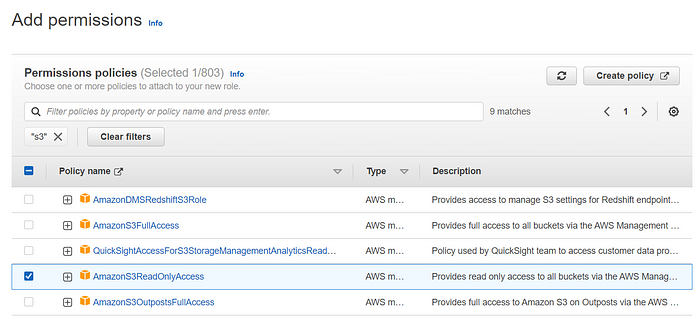
7. Provide a name for the role. I just gave myRedshiftRole. Come to the bottom and click Create role.

8. Click on the newly created role ‘myRedshiftRole’ and copy the Role ARN. This ARN info will be required while copying the data into Redshift.

Step 2: Create an S3 bucket and upload the data file
- Launch S3 console and click on Create bucket.
- Provide a name for the bucket. It must be globally unique.

3. Choose the options ACLs enabled and Bucket owner preferred as per the below screenshot:

4. Uncheck the option Block all public access to make the data accessible from the internet and acknowledge the setting by selecting the check box.

5. Leave other configurations as default and click on Create bucket. We’ll have a new bucket created.

6. Now, let’s make the bucket publically accessible. Click on the name of the bucket and select the Permissions tab.

7. Click on the Edit option under Bucket policy and paste the below policy. Just change the highlighted section with your bucket name and hit the button Save changes.
{
 “Version”: “2012–10–17”,
 “Statement”: [
 {
 “Sid”: “PublicReadGetObject”,
 “Effect”: “Allow”,
 “Principal”: “*”,
 “Action”: “s3:GetObject”,
 “Resource”: “arn:aws:s3:::<your bucket name>/*”
}
 ]
}

8. Scroll down and click on Edit option under Access control list (ACL). Select List and Read permissions for Everyone (public access). Accept the setting by clicking on the check box and hit the button Save changes.

9. Now, again click on the name of the bucket and choose the Upload option. Click on Add files and upload the data u.user to this bucket.
Step 3: Create a Redshift Cluster
- Search for Redshift in the AWS console and launch the Amazon Redshift console.
- Click on Create cluster option.
- Provide a name for the cluster. I have given redshift-cluster.
- We have 2 options for cluster usage; Production and Free trial. Choose Free trial for the practice purpose.

5. Under Database configurations, set a password for the user awsuser.

6. Click on Create cluster and wait for some time. You’ll have a new cluster available.

7. Click on the name of the cluster and copy the JDBC URL available under General information > Endpoint section and keep it safe.
8. On the same page, click go to the Properties tab and scroll down to the section Associated IAM roles.

9. Click on the Associate IAM role and select the role myRedshiftRole which was created in the first step and hit the button “Associate IAM role”.

10. Again go to the Properties tab and scroll down to the section Network and security settings. Click on the VPC security group link and you will see a new page for security group settings.

11. Select the Inbound rules tab and click on Edit inbound rules option. Just add the rules as mentioned in the below screenshot and hit Save rules.
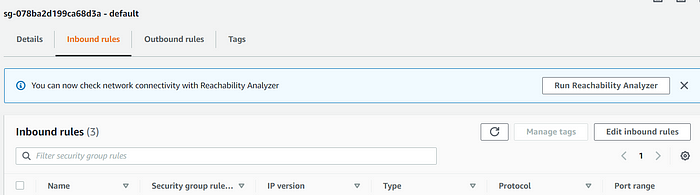

12. Now, click on the Edit option under Network and security settings. Select the checkbox for Turn on Publically accessible and Save changes.
Step 4: Setup Connection with Redshift Cluster
- Download the Amazon Redshift JDBC driver file from here and unzip it. We need the file redshift-jdbc42–2.1.0.10.jar from the unzipped folder.
- Download SQL Workbench/J using this link, unzip the file and open SQLWorkbench application. It is a query editor which we’ll use to execute queries for transferring data.
- A query editor will open now. Go to the File menu and click on Manage Drivers…

4. Click on the new option available at the left top corner (Highlighted red in the screenshot) and provide a name for the driver. Click on the folder icon and navigate to the jar file location and select the file redshift-jdbc42–2.1.0.10.jar. Provide classname as com.amazon.redshift.jdbc42.Driver and click OK to add the driver. Below is the screenshot:

5. Once the driver is added, let’s make a connection with the Redshift database. Now, again go to the File menu and click on Connect window option. You’ll see a new pop-up window.

6. Provide a name for the connection. Select the driver from the dropdown which you added in the last step, paste the JDBC URL copied from the Redshift cluster and insert the database Username (awsuser) and Password which were created during the Redshift cluster setup, then click on Test. You’ll see a connection successful message. Now, click OK to go back to the editor and run queries.

Step 5: Data transfer from S3 to Redshift
- Once the connection is successful with the Redshift database, run the below query to create a table user_info with the schema similar to the file u.user uploaded in S3 bucket. Hit the execute button (highlighted in red) on the query editor to run the query.
create table user_info(
 id int,
 age int,
 gender varchar(10),
 profession varchar(50),
 reviews varchar(40));

2. Execute the below query to COPY data from the S3 bucket to Redshift. Edit the query with your bucket name.
copy user_info from ‘s3://<Your-bucket-name>/u.user’
credentials ‘aws_iam_role=arn:aws:iam::612883173185:role/myRedshiftRole’
delimiter ‘|’ region ‘us-east-1’;

3. We can verify the created table in Redshift using the below query:
select * from pg_table_def;

Form the above result, we can see that the table user_info got created under the public schema.
4. Now, we can verify the schema of the table using the below query:
select * from pg_table_def where tablename = ‘user_info’;

5. Let’s verify the copied data using the below query:
select * from user_info;

Conclusion
We have seen from the above exercise that the data has been efficiently transferred from S3 to Amazon Redshift. We can run on-demand or scheduled queries to copy data into the data warehouse and use it for further analysis.
Due to the features like High performance, Low cost, Scalability, Flexibility, Security, etc., Amazon Redshift is becoming the most popular choice for Data Warehouse service among organizations.


